|
iPhone and iPod touch User Guide |
|
|
|
|
|
|
|
Step 1 - Setting up a match
Start ProTracker Tennis from an icon on the Start screen.
 |
|
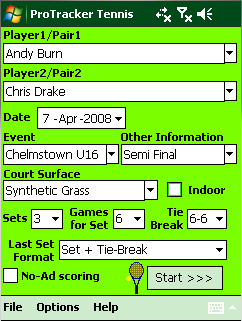
Enter the players' names, or select them from the drop down lists (if you have
tracked them previously). For doubles matches use '+' or '&' symbols between the
player's names. Then enter information about the match, the date (which defaults
to today), the Event, court surface and match format.
Make sure the match format is correctly entered, especially the minimum number
of games needed to win a set (usually 6), the number of sets and the format of
the last set of the match (which is sometimes different from other sets, maybe
just a tie-break).
You can also set the current score if the match has already started (Options >
Set Current Score) - make sure you start tracking at the start of a new game. |
|
 |
|
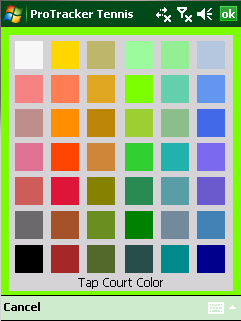
If you are not happy with the Court or Text Colors,
change them using the Options menu.
Tap the Start >>> button to start tracking.
|
|
|
|
|
|
|
|
|
|
|
|
|
|
|
Step 2 - Tracking
|
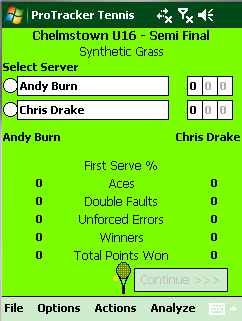
The Score screen is displayed. The first thing you must do is indicate which
player is to serve first - Tap on the radio-button next to the player's name.
For Doubles matches you will also be prompted for the Receiver.
Now tap the Continue >>> button.
A Tennis court will be displayed on the screen. At this time you may want to
change a couple of options. If you are standing at the side of the court,
rather than the end, Tap on Options > Court View > Side-On - you can then
hold the PDA in landscape mode and menus will appear correctly. If you are
in bright sunlight, you can also select the option to view in Black and
White.
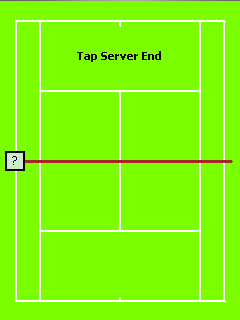
During a match flashing text will indicate the action needed, as follows: |
__ |
Tap Server End - Tap on the end of the court from which the server
will serve.
 |
|
|
|
|
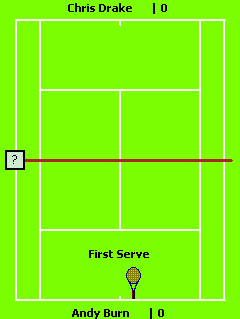
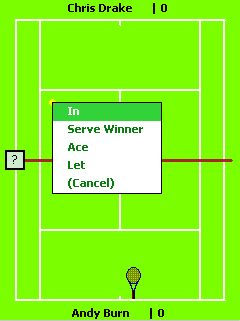
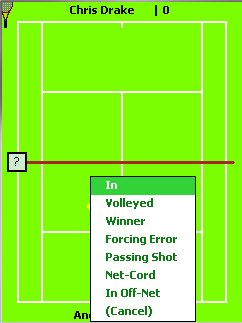
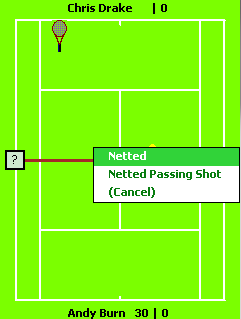
First Serve and Second Serve - Tap on the court on the
position where the ball bounced (or hit the net) and select an option from the
pop-up menu of outcomes that appears. (TIP: the first option in the list is
usually the one required and it will be Tapped automatically for you after a
short pause) To move the server position, Tap to the left or right of the
racket. Tap on the Racket itself to record a Foot Fault. |
 |
 |
|
|
|
|
|
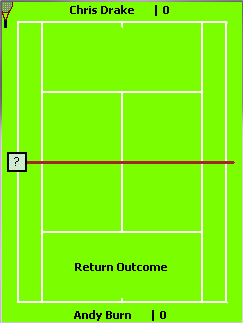
Return Outcome – This prompt will appear only if you have chosen to
track Serve Returns. If so, Tap on the court at the position where the ball
bounced (or hit the net), and select the option from the pop-up menu of
outcomes that appears, the default option will indicate the ball was In. The
position from where the Return was played is assumed from the angle and
depth of the serve. |
 |
 |
|
|
|
|
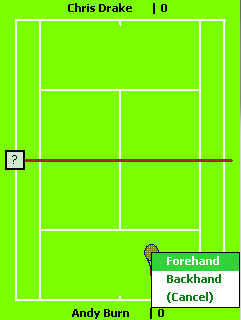
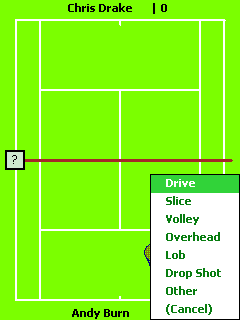
Shot Position and Type - When the point ends decide if the key shot
was an error or a winning shot, Tap on the court at the position where the
shot was played from. Two pop-up menus of shot types will appear in
sucession from which the type of shot that was played can be entered. If you are tracking a doubles match, you will
also first be prompted for the player's name who played the shot.
|
 |
 |
|
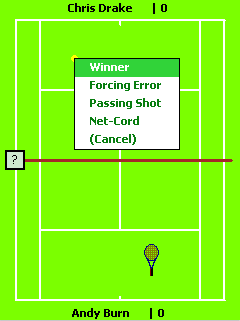
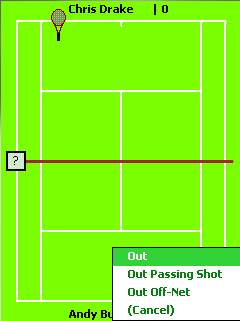
Shot Outcome - Tap on the court at the position where the ball
bounced (or hit the net), and select an option from the pop-up menu of
outcomes that appears. (TIP: the first option in the list is usually the one
required and it will be Tapped automatically for you after a short pause).
|
|
|
|
|
|
|
|
|
|
|
|
|
|
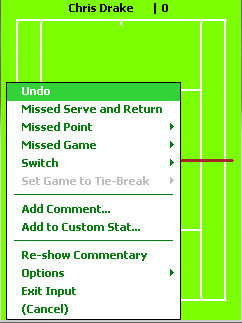 |
If you make a mistake Tap the small button by the net
marked '?', and select Undo. You can press undo as many times as required to
reverse multiple mistakes. Other options are available from this button. In
particular you can record missed serves, returns, points or games - if you
don't know who won the point or game that you missed, assign it to '?' and
resume tracking - when you next discover the score record the missed Point
or Game again against the correct player.
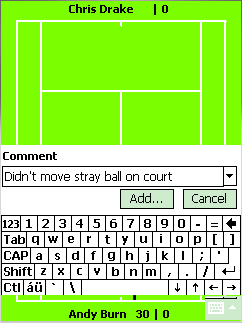
An important aspect of tracking is to record comments for future reference.
This can either be done from the score form (Actions menu), which is
displayed after each game or rest break, or on the court input form.
Pre-defined comments can be entered by clicking on the drop-down list or you
can tap-in a new comment (which will then be added to the pre-defined list
for another time). Tap the Add button, and select the player that the
comment refers to on the pop-up menu that appears. The comments will appear
on the Momentum Chart.
|
|
 |
|
|
|
|
|
|
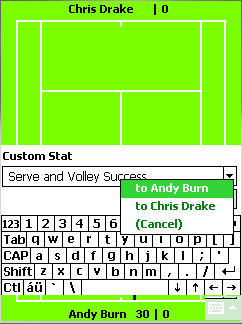
As well as the classic Stats that are used in Tennis, you
may want to keep a count of something during a match, for example the number
of times the Serve-and-Volley tactic is used, you can accumulate these by
using the 'Add to Custom Stat' feature. New stats can be entered at any
time. The resulting stats are viewed on the Stats screen by selecting 'Show
Custom Stats'.
At each change of ends the score screen will be displayed. On here is a
summary set of stats, and you can analyze the match so far. Press the
Continue >>> button when the players resume. |
|
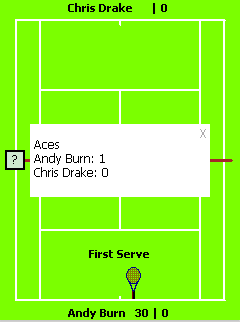
TV-style Commentaries are displayed during a match on
interesting shots and points, such as Aces, Double Faults, Set and Match
Points. These will appear for a short time - you can hide them immediately
by pressing the X in the corner and re-show them by selecting the option on
the menu. By tapping anywhere other than on the X the Commentary will stay
shown. Game summaries can also be shown after each game. Commentary options
can be set on the Settings form.
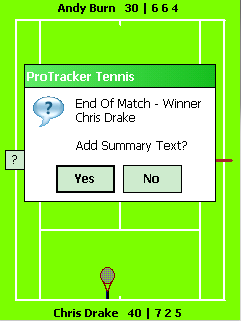
Tracking will stop automatically when the match is
won or lost. Or, if the match ends prematurely tap the 'Early Match End'
menu option. Just after the match finishes you can record a summary of the
key aspects of the game: what went well, what could be done better etc.
|
|
|
|
|
|
|
|
|
|
|
|
|
|
|
|
Step 3 - Saving and Loading matches
Every point tracked in a match is automatically saved to a match file - so
you can either analyse a match immediately or load it for later analysis.
You could also send the match to someone else to analyse - for example a
parent could track a match and e-mail the match file to the player's coach.
Match files are stored in a folder (in 'My Documents/ProTracker Tennis' by
default); file names consist of the two players' names plus the date. Match
files produced on the Mobile device version can be loaded on the PC version or
vice-versa.
To load a saved match, enter the players names and the date of the match and
tap the 'Load >>>' button. Alternatively you can browse for the match you
want from the Browse menu option. On the PC version you can also 'Open' the
file itself (double-click it).
If you entered a Player's name incorrectly, you can correct it by Tapping on
the name or by selecting the File > Re-Name Player menu option. After
correcting the name tap on another area of the form to save the change. |
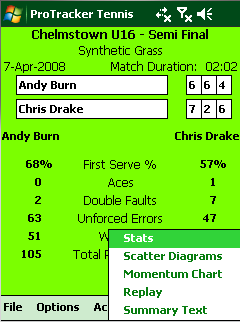
Step 4 - Analyzing a matchAn 'Analyze >>>' button
will be displayed at the end of the match, or the Analyze menu option on the
Score page can be tapped at any time. The following types of analysis are
provided:
 |
|
|
|
|
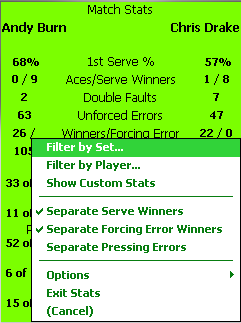
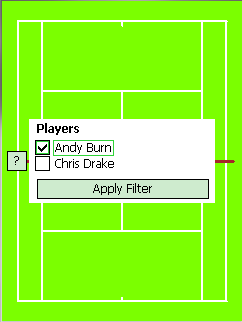
Stats - Detailed statistics can be shown, which can be filtered by
Set or Player if required. Filtering by Player is useful in doubles matches
to get the Serve %age etc for each partner. There are some options as to how
Stats are counted: Serve Winners can be separated or they are counted with
other Winners Forcing an Error; Forcing Error Winners can be separated or
counted just as Winners; Pressing Errors (those caused by the player
pressing the opponent) can be separated from Unforced Errors. Any custom
stats that have been accumulated can be displayed using the 'Show Custom
Stats' menu option. |
 |
 |
|
|
|
|
|
|
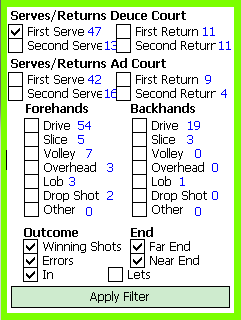
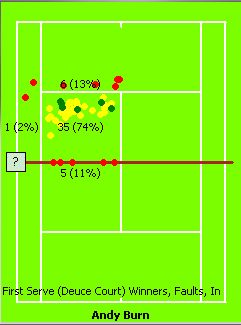
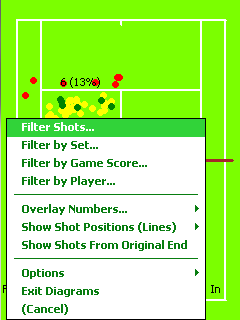
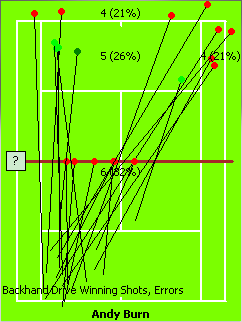
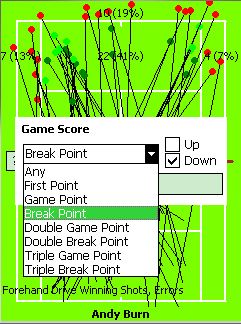
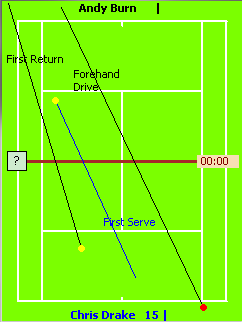
Scatter Diagrams – Serves, Returns and Key Shot directions and
outcomes can be viewed graphically. Optionally a line is drawn from the shot
position to the bounce position, at which a coloured ball is shown (green
for winner, red for out etc) - a key can be displayed if required. Filters
let you select the player, shot, set and game score - so that you can
home-in on particular aspects of the play. Useful information can be
obtained from the displays, such as which shots are producing errors and
where winners are coming from. Numerical Counts and %ages can be overlaid on
top of the shots or separately. By default shots from each end are grouped
together but they can be separated if required - for example, to illustrate
the affect of a strong wind.
|
|
|
 |
 |
 |
|
|
|
|
|
|
 |
 |
 |
|
|
|
|
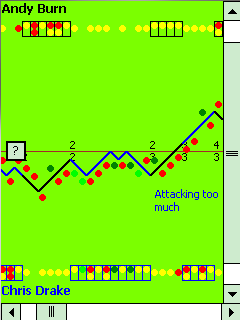
Momentum Chart - The flow of points in the match can be seen to
pick out momentum swings and turning points. Often an incident during a
match, such as a disputed line call or long deuce game, can change the
outcome - this chart helps identify this and graphically illustrate it to
the player. Each time the player named at the top left of the screen wins a
point a line is drawn diagonally upwards, and downwards when the other
player wins a point. The score and set times are shown along with any
comments that were recorded, and the line colour reflects which player is
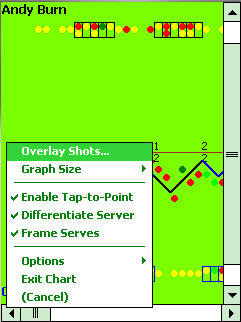
serving. You can also Overlay shot outcomes on the chart; coloured balls as
on the Scatter Diagrams are used. Serves and Returns are shown near the
player names and key shots along the match flow line - these enable you to
see at what stages in a match points are being decided by winners or by
errors, and the impact of serves. By Tapping on the chart you will be taken
to the Replay screen so you can see the details of the particular point that
was played at that time. |
|
 |
 |
|
|
|
|
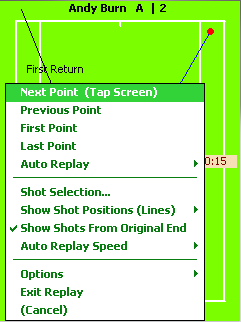
Replay – The shots that have been tracked during each point are
shown, with coloured balls used to indicate shot outcomes. You can step
through each point in the match and set it to replay automatically. |
 |
 |
|
|
|
|
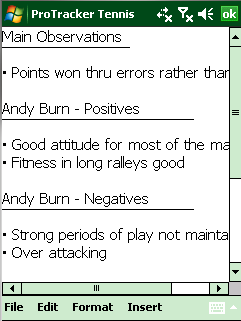
Summary Text - A template is used on which text can be keyed to
record a summary of the key aspects of the game: what went well, what could
be done better etc. The template can be edited using the Settings form, so
you can record the same factors for every match tracked.
|
|
|
|
|
|
|
Report – (this feature is only available on the PC version).
Printed reports on the match can be produced, click
here
 to view an example match report. A set of pre--defined page layouts are
provided or you can design your own layouts. Report pages consist of
component forms such as the match score, stats, scatter diagrams, Momentum
Graph and free text. The Report page format can be changed to match your
printer using the File > Page Setup. To edit one of the individual
pre-defined layouts, Click on the Edit menu and un-check the Lock Layout
option; after doing this, when the mouse is moved over a form it is
activated and you can change the options, move it or delete it. To add a new
component form Click on Edit menu and select the form type you want to add -
it will be positioned in the middle of the screen from where you can
re-position it and set the options required. Free Text forms can be used for
titles and other information - you can insert player names and other
variable text by clicking the Options button and Add AutoText. To help with
alignment a grid is used - after a form is moved it will 'snap' to the
nearest grid point, if this option is active.
to view an example match report. A set of pre--defined page layouts are
provided or you can design your own layouts. Report pages consist of
component forms such as the match score, stats, scatter diagrams, Momentum
Graph and free text. The Report page format can be changed to match your
printer using the File > Page Setup. To edit one of the individual
pre-defined layouts, Click on the Edit menu and un-check the Lock Layout
option; after doing this, when the mouse is moved over a form it is
activated and you can change the options, move it or delete it. To add a new
component form Click on Edit menu and select the form type you want to add -
it will be positioned in the middle of the screen from where you can
re-position it and set the options required. Free Text forms can be used for
titles and other information - you can insert player names and other
variable text by clicking the Options button and Add AutoText. To help with
alignment a grid is used - after a form is moved it will 'snap' to the
nearest grid point, if this option is active.
(TIP: prior to printing a report, check that each page is displayed as you
need - aspects of the match may mean that the layout needs some alteration.)
On the PC Version you can compare matches easily by loading multiple
ProTracker Tennis Windows - do this by selecting the New Window menu option.
You can even open more than one Window onto the same match file, which might
be useful to compare the players or a player's performance in different
Sets. You can also Print individual screen images, rather than a report.
|
|
|
|
|
|
|
|
|
|
|
|
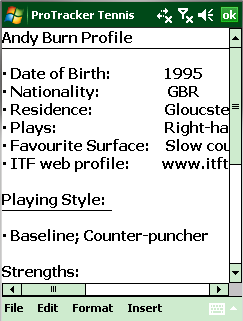
Player Profiles
You can keep information on Players using the Profiles facility. Tap on
the Players Name or select File > Edit Player Profile. A Template profile is
displayed on which text can be keyed-in. The Template can be edited using
the Settings form so that the same factors can be recorded for each player.
Player profiles can be included in printed match reports using the PC
version of the software.
|
 |
|
|
|
|
|
|
|
|
|
|
|
|
|
Settings and Options
The Settings menu option lets you define the level of tracking you want to
do and lets you set up information in advance. Various Tabs are provided: |
|
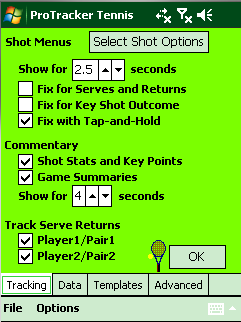
Tracking Tab - you can decide how long you want Shot menus and
Commentaries to appear for before an option is automatically tapped, and you can
choose if you want to track Serve Returns. The individual shot outcomes can be
selected using the 'Select Shot Options' button - this gives you a fine level of
control of what information is captured during your matches. A tracking profile
(Umpire, Parent, Player and Coach) can be chosen from the Options menu to
provide a default set of values.
 |
|
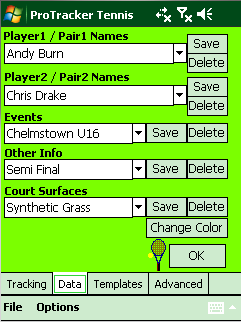
Data Tab - Player names, Court surfaces and their default color, Events
and other items can be keyed-in - this will save time later and allow for
mistakes to be corrected. After making a change, Tap the corresponding Save or
Delete button as appropriate.
|
__ |
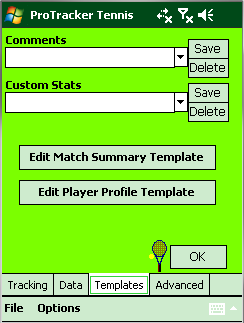
Templates Tab - Comments and Custom Stats can be
keyed-in and the templates used for Match Summaries and Player Profiles can be
set up.
|
|
|
|
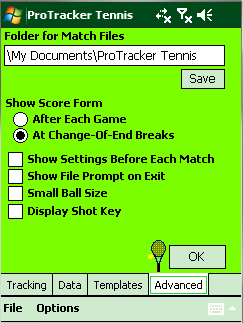
Advanced Tab - you can define the folder used for
match files and the various other settings. On the PC version you can press the
'Sync Folder' button after you have established a shared data folder with your
PDA - this way your match files and player profiles will be automatically
synchronized. Other settings include the ball size to be shown and whether you
want to see the summary stats and score after each game, or only at rest breaks.
|
|
|
|
During a match other options are available. In particular you can choose
just to record the points in a match rather than the shots - to do this,
select Track Score Only from the Options menu on the score screen. (TIP:
this option can be used to catch up if you miss a few games)
|
|
|
|
|
|
|
|
Moving matches from the Mobile device to
the PC
Before you can use the PC to analyze or print a report
for a match tracked on the PocketPC, it needs to moved. To do this, Sync
your Device to the PC then use Windows Explorer to
browse to the match file, which you will find in the folder called
'ProTracker Tennis', drag the file and drop it into the 'ProTracker Tennis'
folder in your Documents on your PC. You can then either open it with the PC
version using the File menu, or just double-click on it.
If you want to Sync match files
automatically every time you cradle your PocketPC, please follow the
instructions
here
|
|
|
|
|
|
|
|
|
|
|